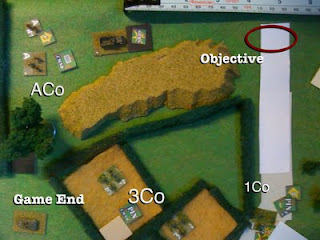
Sunday, August 28, 2011

CDTOB West Front Scenario 1 Last Report

Finished the game.

Turn 5 is here.

German Victory by about 12cm!

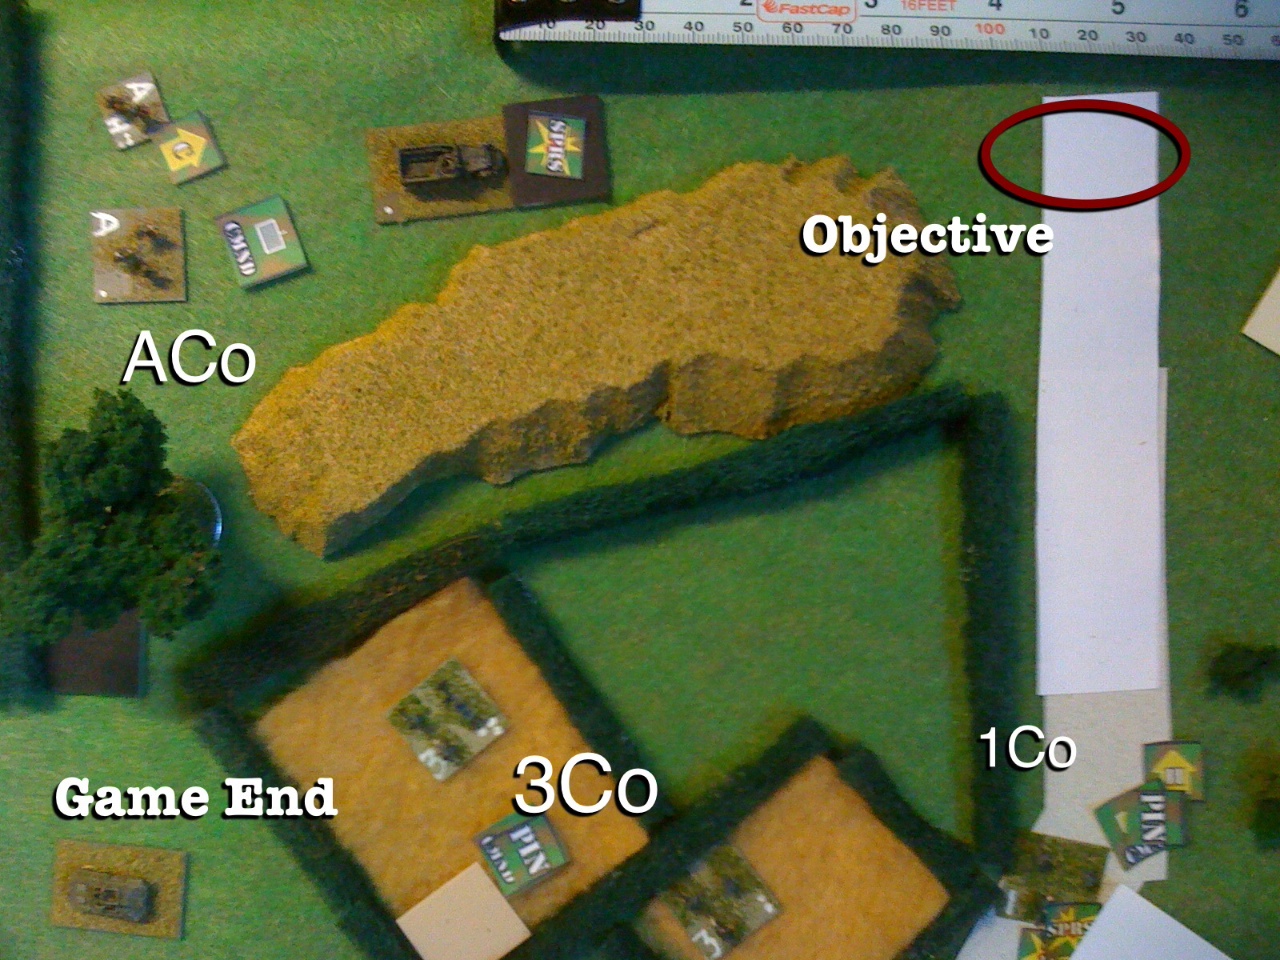
ACo was the most likely to pull this off. They were slowed down by H&I fire in turn 7 because I had only placed them under Cautious advance.

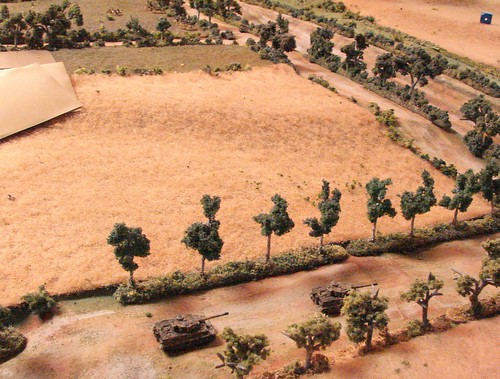
Their halftrack was going to be able to make it to the exit point objective - with a possible fight on it's hands with 2 German platoons from 1Co. So, in the orders for turn 8 they were put under cautious advance - my thinking - they would need more favorable numbers when battling and didn't need the negative die roll modifier that is applied when you hasty advance. Well, good H&I rolling for turn 8 landed smack in front of the Halftrack! They can't move.

For the Germans, this was a good thing because the 2 platoons they'd sent out to defend that space ended up being pinned and suppressed about 10cm from the point. They wouldn't have been able to lay down any effective fire.

Definitely learned more about the game and things to think about when playing. I would not favor this as a solo game. A lot going on and each turn took me about 45 minutes a pop.

I feel a lot better about being on the attack. Though I had a heck of a time with the city. Next time I wonder if I should concentrate on the center with more of the force.

I received some great answers to my questions over at the Test of Battle forums - go check them out - mainly from the author - not bad.

I was going to replay this in Blitzkrieg Commander to test the differences. A couple things has changed my mind about this: 1. I'm done with this scenario - I took too long to play it. 2. and most important - I'm sent in my registration to do my first ever GMing of a game at a small con held here in St Louis called Command Con in November. I will be running a BKC II game! Nervous and excited. More in an upcoming post.

Wednesday, August 24, 2011

Rampant Peace Breaks Out on Wargame Blog

Henry Hyde

Henry Hyde

@battlegames Hove, East Sussex
Editor of Battlegames, writer, designer, linguist and wargamer with ambitions to be a wealthy, eccentric bon viveur!
Keith, at Keith's wargaming blog posted some maps from Battlegames magazine in one of his posts. You can see the original post here.  (well almost original, as you'll see as you read on...)

And then Keith posted this a few days later and of course, then read comments.

It was resolved when Henry Hyde, owner of the magazine, and originator of the copryright complaint, worked it out with Keith to allow him to post nicer versions of the maps on his blog. But this time with his consent and with proper attribution.

Who would guess that such peace could be found in such a violent place?

Seriously, way to go guys in resolving this so quickly and so openly.

Speaking of Copyright - both photos have been used without permission of their owners (when will we learn?). Henry's is from Twitter - what is the copyright on that info anyway?
And to the left is Keith.

Btw, Henry is the one that said rampant peace had broken out.


Speaking of all that - Osprey is hiring - following is from their twitter feed and then from their website.

Osprey Publishing

Command Decision TOB Western Front Scn 1 Turn 5 GIP

ACo was able to take out a platoon from the German right flank, but couldn't take them out. But they're still demoralized, so they're not much of a concern.

Unfortunately, I Bn's progress in the center is stalled because of a Pin result on the morale phase. That holds them back a turn, at least. I suppose the Infantry riding on top can't get off either. And, I wasn't sure if the riders cancelled the automatic suppression for infantry being within 12 cm of armor.

CCo on the right only lost one platoon to fire and got away with a simple Pin on the morale check. However, it was the loss of the Company HQ that won't help them much.

The more close up pictures were taken because someone said I should get closer. So, not great with the iPhone, but not too bad...right?

Turn 4 here.

Turn 6 - game end here.

Tuesday, August 23, 2011

Nothing New Under the Sun

When I thought of the name, Itinerant Hobbyist, I did some quick searching to see if I found anything with a similar name. Nothing. Then just a few minutes ago I saw a link from someone's site leading me to this site:
Itinerant Wargamer

 Proving yet again, there's nothing new under the sun.

I know it's different, but still pretty close.

Monday, August 22, 2011

CDTOB Western Front Scenario Turn 4 GIP

Turn 3 here.

Turn 5 here.

Quite eventful. The US arty pinned the German Co covering the US left flank. Effectively knocking down their shooting ability, because on top of pinned, they were suppressed. This is a big role is supposed to play. ACo was able to lay enough fire on them to kill one unit. Which, when the morale phase rolled along, they suffered some big penalties and were required to fall back and became demoralized. Which effectively shuts them down a few turns. ACo will be pressing hard this next turn.

On the center I Battalion will have to Hasty advance each turn to make it to the road junction. I've decided to move them in that direction because I don't see them knocking those Germans out of the objective town at the crossroads by the end of Turn 8.

Which brings us to the Germans covering the center. They were given the command to hold. However, I'm wondering now if they should fall back to positions closer to the road objective. They could still move under the cover of the hill and bocage and be able to get all the way back to the road. Thus being within 6cm of it. Perhaps the next turn.

One thing I could've done was to move two platoons back and leave the command and weapons team on the hill. However, this would put them out of command. And one thing I'm not clear on: if a unit is out of command, can they fire either in prep, opp, general?

On the right, it was disaster for the US. BCo went through the hedges. (Should've saved smoke for this turn.) Sure, the infantry gun couldn't see them...but the R35, Weapons team, and Platoon in the objective city could. They took out an infantry platoon, the mortar team, and the weapons team. The subsequent morale check caused them to be eliminated - the whole company.

The question is, does CCo need to take a morale check because they saw a company eliminated? I wouldn't think so during the morale phase. It's all happening at the same time.  Frankly, I'm not sure what to do with CCo. When they step through the hedges, it's all going to happen again. Maybe, go around the hills to the right?

This turn shows a big part of this game coming through: command and morale. For example, the center dilemma for the Germans - do you purposefully spread your company out? One the US left - pinning a couple of the platoons, pins the entire platoon. Then by killing one, the entire platoon suffers the penalties and are all forced back and demoralized. Pretty heavy price to pay. This was the toughest aspect of this game to get used to. Then, of course on the US right, BCo being eliminated because of an extremely high morale roll. Heavy stuff. -6 modifiers alone because 3 units were eliminated. Then, being within 12cm of an AFV and of personnel.

Missed Saying something about 10

Sweet, thank you to the 10 followers...no wait, now 11, for, well, following.

Sunday, August 21, 2011

Beautiful or Simple Wargaming?

Saw this post that is along some lines of what I've been thinking of this hobby:

From the Lone Warrior site.

Answer to Command Decision Bocage Questions

From this post I received some answers on the Command Decision Test of Battle forum:

This one from Jake Strangeway, the author.
Where he said:
Hello,

"1. Is a unit spotted behind bocage if they fire, yet the rules say that you have to be on the edge of bocage to see the units."

Bocage blocks LOS - so, if a unit is not at the edge of the bocage, anyone outside the bocage, assuming they were not at a higher elevation, cannot see them.

"2. I'm also wondering about what units see at different levels. In the picture in the lower left, with the gigantic ruler of god over the battlefield, I'm wondering if the BCo (the US Stands behind the bocage, nearest the hill would have been spotted when crossing over the bocage in the back (Where CCo now resides.) toward the spot where they are now.

I think not because the level two bocage is always closer to the US troops than to the Germans. Now, I'm not confident of the BN HQ atop the level 2 hill. Based on what I read in the rules, I don't think so."

Bocage is level 1, not 2, but still, the stands on the the hill cannot see the stands past the far bocage because the near bocage is still closer to the US stands than it is to the German stands. Now, if the hill were level 4, it could (i.e. 3 levels higher than the bocage) then the German stands on it would be able to see over the bocage and see all the US troops.
This one from a sticky topic on bocage.
 For some reason I was under the impression bocage was level 2 in this scenario. I'm going to finish playing the game this way, but will have to change it for next time.

Here's the sticky topic on bocage on the forum.


Thursday, August 18, 2011

Western Front Scenario 1 Turn 3 GIP

US ACo commander is forced back by Arty fire, other stands simply suppressed. ACo then assaults German Weapons team in entrenchment, German opp fire forces that stand back. In following fire by the US weapons stand, the German weapons team is forced back and out of the entrenchment. The US weapons team gladly moves in.

I had a US Platoon next to Bocage, I didn't close assault, they're on one side of bocage and German platoon is on the other. The question: is there still cover for the platoons? They're behind bocage. Sure, they're right there, but wouldn't they be harder to hit, cause they're firing over and through that stuff? But, on the other hand, it seems a tad odd. In fact, i can't believe I ruled it that way.

I BN moved up/over from the East, actually came in last turn, just forgot to mention it. They made it to le Motey with I BN HQ setting up shop there. Nice base for Arty spotting and morale.


B and C Cos basically got themselves set behind bocage for the inevitable march toward the towns and the open fields of fire. I Bn command will call in smoke in front of the infantry gun...but now I realized that I'm focusing too much on the Northern town. It's the one just to the South of it where I need to concentrate my efforts. I'm going to have to rethink how I approach the town.

Rules questions about bocage
I've also got some questions concerning the spotting of troops.
1. Is a unit spotted behind bocage if they fire, yet the rules say that you have to be on the edge of bocage to see the units.

2. I'm also wondering about what units see at different levels. In the picture in the lower left, with the gigantic ruler of god over the battlefield, I'm wondering if the BCo (the US Stands behind the bocage, nearest the hill would have been spotted when crossing over the bocage in the back (Where CCo now resides.) toward the spot where they are now.

I think not because the level two bocage is always closer to the US troops than to the Germans. Now, I'm not confident of the BN HQ atop the level 2 hill. Based on what I read in the rules, I don't think so.

Turn 2 here. 

Turn 4 here.

Wednesday, August 17, 2011

Western Front Scenario 1 Turn 2 GIP

Command Decision: Test of Battle, Western Front Scenario 1 out of the rulebook.

Turn 1 here.

ACo took it in the kisser losing two Hafltracks to opp fire (one was from a weapons stand from 20cm away! Rolled a 10 for the hit effect. The crew bailed out but was hit and taken out (rolled a 9 for the effect.)!

CCo lost just one platoon to 105 fire (1 out of 3 stands took a hit.)

Germans took no losses.

Remarkably everyone, even ACo, maintained morale. That would not have happened if I'd been playing at Jerry's place! I usually roll very high for my morale rolls.

Turn 3 here.

ACo disaster. 2 Halftrack plts and 1 infantry plt destroyed.
Forgot to label I Battalion coming in from the bottom of pic.

Which makes better bocage?

Pot scrubber
Or
Clump foliage glued to Popsicle stick?
I know the answer and understand some of the change that could be made to make it look better.

Western Front Scenario 1 Turn 1 GIP

Game in progress.
US move, hold command for all Germans. No opp fire because they don't want to reveal themselves.
Took me 1 hour to do this much 'cause I needed to sort out my order/effect chits. (Another to do - decoupage those bad boys onto some cubes.)
And of course rule look-ups. Need to look up Close assault with troops in Half Tracks. Should I lay smoke, dismount, CA, and support with HmGs on HTs? Or, rush up there with HTs, then dismount?
If troops moved through open fields to rush behind bocage, are they now concealed or something else.
This I what I like about games, you can read about something all you want and think you have it. But once the dice start rolling, half of what you read leaves you. But after a play or two the basics stick.

Turn 2 here.

Monday, August 15, 2011

Interesting Promotion 99 cents


Columbia Games, boardgame publisher has an interesting marketing campaign selling their popular, Hammer of the Scots for a $.99 trial. That and free priority shipping. Nice.

It will be interesting to see if this works.

I also like them sharing a video review - nice to see what games look like and basics on how to play.

Saturday, August 13, 2011

Great Terrain for 6mm

Everytime this guy, Mark(?) Luther, creates a gaming table, I'm amazed how natural it looks. His game reports are fun to read and the pictures tremendous. Nice inspiration.

Click on this link to see his Flickr sets.

Tigers moving up

Friday, August 12, 2011

Cool Game Stores & Distraction Alert

Saw the above displays at Valhalla's Gate in Columbia, Missouri. It's a great board game, miniature, and RPG store in the SouthEast part of town. Whenever I'm passing through between KC and St Louis, I try to stop by. They even have some 6mm terrain. They have several cases of painted minis like these Dystopian Wars Prussian and Rising Sun land models. I probably should've bought the JR minis roads I saw there. Instead I picked up 4 D10inD10 dice to use with Command Decision, 30 5mm dice (casualty markers for Blitzkrieg Commander), and a 50% off Heroclix box for the boys.

About an hour and a half before that I discovered, Tabletop Game and Hobby, located in Overland Park, Kansas. Similar stock as Valhalla's Gate. Both stores also had ample gaming space. And, they also had some 6mm items. I bought a pack of JR Miniatures buildings there. By the way, I just saw the picture of the building I bought on the JR site... based on the photo I probably wouldn't have bought it, but in the package it looks better than the photo - it comes unpainted of course.

And, a week before that I was in Independence, Missouri, and visited, for the first time, Game Cafe. Very helpful manager. He stuck with us for a long time as the boys picked out some specialty HeroClix from behind a cabinet. There was a magic tournament going on and it was crazy there. Lots of board games and card games. Some GW minis were there, but that's about it for minis. I  did pick up the black wash to give it a try. The board games were chaotic and quite disorganized. Stores like this I wish I could help out.

In all 3 stores I saw non-gamers (so it seemed) come in and say out loud, "We're looking for a game." Not that any of them wanted it, but not a soul helped them out. Sad.

Thursday, August 11, 2011

Conversation about different eras of gaming

This is a link to a blog that I follow and had asked a question that I've asked on a couple of forums and websites:

http://wargamestuff.blogspot.com/2011/08/in-answer-to-question.html

The photo is from his blog of some of his Samurai.

This kind of conversation is the whole reason I like blogs, forums, etc.

Thursday, August 4, 2011

Army setup Western front Scenario 1 CDTOB

The German Set-Up, though hard to see.
View from the Level 4 Hill-German Battalion Perspective
Reinforcements. I've added an M20 Greyhound
US Set-Up - Need to get a program to annotate the iphone pics.

Here are photos of the army dispositions.

The US will send A Co/2nd through the left flank to secure and possibly go for the exit/crossroads victory objective. The US must control that or the town on the hill, Amfreville. Since I don't have near enough stands for the reserve force, I've given the US some Halftracks because I don't have near the forces for this battle. So, perhaps the speed and HMGs will help them out. The B and C Cos on the right flank will go straight for the town. First with some smoke help and then some hits from the off board 105s. B Co is behind the bocage, on the road on the right flank. C Co is in the swamp, just off the edge to prevent any German bombardment silliness before turn one begins.

The Germans filled up Amfreville. The Battalion CO is on the level 4 hill to provide a nice spotting perspective to lay down their 105mm arty. On the hill is also an 81mm mortar and a 75mm infantry gun. The German R35 is on the hill, hull down, in front of the level 4 hill.

The center is covered by 2 Co in the bocage and on the hill with a weapons team leading the way.

The right is covered by 3 Co with a MMG pointed down the road and to the town Le Metry (sp).

One thing I like about the photo from the Batt Co's perspective: you really can't see the troops hidden behind the pot scrubber...I mean bocage. And, if I understand the spotting/terrain rules correctly, he won't even be able to see them as they cross the bocage because he's less than 3 levels higher than the bocage (It's level 2 while the hill is level 4.) And, the bocage obstacle will be closer to the US units than the bocage will be to the hill.  (Rule 11.2.5)  To rephrase that, the bocage obstacle has to be closer to the higher stand than to the lower stand in order for the spotter to see what's behind the obstacle.

I've got a few rules that will slow me down namely:

Limbering/towing
Smoke
Arty
Understanding Terrain mods
LOS (really BUAs)
BUAs

Hopefully this will get played in the next week.

Tuesday, August 2, 2011

Inspiration from fellow blogger

I'm always running across blogs of gamers. Most of them, like mine, are pretty sparse. But I get it. This is a hobby that makes you want to share what you're learning to share the progress you've made, to share with community. So you start a blog.

But most gamers are also OCD and ADD. And it's easy to get distracted. I started this miniature hobby to recreate the actions of the 12th Armored in WWII. Initially their, and other US units, involvement with the Southern part of Operation Northwind. So I looked for rulesets, found Blitzkrieg Commander. Cool, I have a set. Oh wait, here's Mein Panzer. Okay, I'm good. What's this? Too Fat Lardies? Nice, I've got all the sets I would possibly need...but wait, there's Command Decision Test of Battle. See what I mean.

I chose 6mm for the cost, ability to game on small space, and the quicker ability to paint, etc. That part I've not wavered on. What I've moved away from is focusing on building out the 12th AD and German equivalents from that era. I was distracted by the scenarios in the books I bought and the supplements.

But after reading through all of Goomba Geek Fletch's blog. I was inspired to move back to my roots. Get back focused on my original intent: build the 12th AD in it's whole glory on an, essentially one to one scale. (Well, I would build it where a stand equals a squad and the squad would be represented by 3 figures. So yes, a little cheating. But I'm comfortable with this.)

While my intent is 1 to 1. I will begin it by modelling it where each stand is a platoon. This will give me plenty of variety and models to play other scenarios while I design/steal/borrow some Northwind scenarios.

Goomba inspired me because he's in a similar place as I am. Seems new to the hobby (the WWII side of it anyway.), wants to focus on a particular unit, The Green Howards, and gets distracted.

So thanks Goomba for the inspiration to get back on track and stick to my goals.

Table for Command Decision Western Front Scenario 1

Same orientation as the picture to the right.


The bottom is the German Base Line
From the Southwest view. The building is le Meury (?)

Center of German line. Amfreville on left. le Meury on right
Took me a couple hours but I laid out the table and terrain for a playing of the first scenario in the Command Decision: Test of Battle rulebook (pg. 110).

I hope to play this in both CD TOB as a first solo play through. Then I will follow it up with a play through using Blitzkrieg Commander II.

I would like to get a few more roads (instead of the paper ones I'm using on this table.) and more rivers from JR miniatures. Jerry, with whom I've played a couple of CDTOB games with  has some great small roads made by ?...whoever it is, is now out of business. He uses them for trails and he's using 15mm.  Two things I like about them. One, they're less wide. Two, they're much thinner. The roads I have now are about 3mm thick. Which is quite tall for 6mm men.

I could also benefit from making some more raised terrain. Perhaps some big sections like the big hill shown on the scenario sheet in the top left picture.  I can make those.

Oh yeah some bridges would be cool too. One thing I could do much better: play with what I have. Don't wait for perfection. Like the layout of this particular entry. I don't like it, but I'm going to run with it.