
I played the imaginary Battle of the Bulge scenario,
"If you go down to the Woods Today," found on the downloads section of the
Blitzkrieg Commander website.
The initial US forces include:
1 x CO (CV 9)
4 x Infantry
1 x MG Support Unit
1 x Mortar Support Unit
Reinforcements (Turn 5 based on Mobile deployment, ie, may or may not show up!)
1 x HQ (CV 8)
5 x Infantry Units
1 x MG Support
1 x Sherman 75mm
1 x M10 (used M24 as Proxy - no M10s yet. Will get them after I get some other units off the production line.)
German Forces:
1 x CO (CV 9)
1 x HQ (CV8)
1 x FAO (CV 8)
8 x Infantry Units
2 x MG Support Units
2 x 75mm Artillery Units (off-board) - no assets (meaning no pre-planned bombardments. Wish I would've had those. More on that.)
Reinforcements (Same as US)
1 x HQ (CV 8)
3 x Infantry Units
2 x Pz IVs (long)
1 x StuG III (long) (proxy with a French R35 - I know, nothing like it, but hey same story as with the M10s - I'm learning with miniature gaming, if I wait till I have everything I need for every scenario, I'll never play.)
 |
| Orientation - Top is West, Bottom East, Right North, Left South. |
|
Basically, the Germans are trying to take the village on the US side of the table. US is trying to prevent that. Take the village means at least one infantry unit in the village while the opposing team has none. I set the village as Brick meaning it provides hard cover (hit on 6 and save of 5+). In addition, it was impenetrable. This means a unit has to be touching the edge of the BUA to see inside of it. Then once inside it's 5cm visibility for foot troops and 10cm for tanks to see tanks. I like this, optional rule, but it does make things quite a challenge for the attacking force.
Germans set up in the bottom (East third). They set up to move along the north side of the board. The plan was for one company (3co) with CO and MG to attack either from the North, or more than likely to bypass the village and attack it from the West. 1Co and 2 platoons from 2Co, with MG would attack from the East.
The Americans were dug-in and basically facing the East waiting to see what the Germans were doing. The hope was to be at the edge of the city and shoot opp-fire as they approached the city.
Highlights from my notes:
Turn 1
 |
| View from the woods-end of 1 |
 |
| End of Turn 1 |
Germans - Succeeded in a couple command rolls to make good progress to begin the game. Unfortunately, the East attacking force were slowed by the forest. They got in, but didn't make it to the west side of the forest. The West attacking force stalled out by the hill. Decided to place the FAO on the hill to smoke the passage, since they couldn't barrage with artillery. Not sure how to go about doing this when it's impenetrable and they're dug-in.
US - moved in response to German movements. Therefore, they lost their dug-in status, but they still couldn't be seen. Realized Mortar couldn't shell the attackers from their currently placement because they were within the min range of 20cm. Blast.
Turn 2
Germans - Smoking worked to get the West Force safely to West side of village, but then stalled out. Good thing, 'cause the CO was thinking of sending them into the village. When in reality, they should've continued moving South to go into the SW part of the village. Which is what they ended up trying... The East Force continued to stall in woods. (Forgot I could've tried to command them with the CO when their HQ failed their first roll.)
US - Moved to face the attackers. They couldn't see them for the smoke. However, the smoke gave away their position, so they knew where to set up their defense. This would be where they would stay for the rest of the game and ultimately meet their fate. Mortar moved to hill south of town to take out the force attacking from the west. Couldn't do anything once there because of German smoke. However, smoke also cleared the way for their movement.
Turn 3
Germans - Smoked the town again. East force made into town and decided to accidentally assault a US platoon. Mistake. Fortunately, they survived but were the first blood shed and were forced back and suppressed. In the same turn, they overran the US command. And because the West Force had moved further south, the command ran into the Germans in their 10cm move back, thus eliminating them, temporally from the game! Huge, now all the US can do is react via reaction, opp-fire, and initiative.
Opp-fire is just what happened to the West force, they moved from behind the smoke curtain when mortar fire ran upon the lead platoon, suppressing and stalling the lead unit. This caused the remaining platoons to go around.
US - Lost command, not a good thing. 'Nuff said. Though, they did cause some the Germans some pain and hits with initiative fire.
Turn 4
 |
| End of turn 4 |
Germans - Coordinated some effective fire to suppress and put some hits on the US before Close assaulting. Took out 3rd Platoon ACo with Close Assault. In addition, during the turn, US units were forced back into their brethren causing those units to suppress as well. A nice benefit - for the Germans.
US - Initiative and Opp fire do a good job of taking out a German platoon and MG west of town.
Turn 5
Germans - Reinforcements arrive and mount the infantry as tank riders. They make it to the top of the north hill as the HQ places them in such a way to take shots at the potential US reinfocements. Can't decide what to do with the infantry. Lack of US command, helped to make that decision for them.
Units in town took out the US MG unit. Also applied two hits on the harassing mortar on the south hill.
West Force taken out by initiative and opp-fire. 3Co is no more.
 |
| End of Turn five from North Hill Reinfocement perspective. |
US - Failed to roll for command to bring on reinforcements - BLAST! Took out a Company West of town! But it's not looking good in town. Also, mortar fires on tank riders on North hill. One hit inflicted.
Turn 6
Germans - With the lack of US reinforcements, the North hill reinforcements decide to attack from East as well. Troops are delivered and enter the town. Tanks also enter. Troops hold back to be there and fresh for the potential US reinforcements. The two Pz IVs go to the SW part of town to be able to get shots on any upcoming US reinforcements.
 |
| End of Game. |
Now, my inexperience with the rules causes some serious US casualties. The Germans roll a blunder and their units are forced to move 5cm toward the nearest enemy. This puts several of them in contact with US troops for some more accidental close assaults. That part is correct, as far as I can tell from the rules and forum posts. However, where I messed up. One of the assaults last 3 rounds of rolls. A US unit was taken out. The German unit, I thought was allowed to consolidate, but they were already within 5cm of an opposing unit, therefore they shouldn't have been allowed to do this.
But I didn't realize this till after. So they consolidated and took out another unit and then overran the US command unit, sending them back 20cm. This put the US 6 units eliminated and thus 3 units over the breakpoint of 3.
US - Rolled 10 for the breakpoint, significantly higher than the 6 they needed to roll. Game over.
Even if the US troops had made on board, I' don't see how they would've won. The Germans would've out-numbered them significantly in addition to being in the city. I think introducing this game to a newb using this scenario and letting them play the Germans would be a good intro. In fact, I may do just that.
Fun game that took several days to play because of time constraints and also went slower 'cause I soloed it. Seems like I need to create some markers to show when units have fired initiative, opp-fire, when deploying, etc. Maybe when playing with an opponent it's easier to track of one army. I don't ever see any pics of people using markers, so I'll probably get used to this the more I play.
Also, I need to make some gray card/felt for BUAs. I was just using the buildings as an outline, moving them when needed. However, if playing an opponent, it might make things unclear.
Here's
a link to the other photos.


 I was testing the Naval Thunder ruleset out. Very straightforward and fairly easy to remember the various nation specific rules.


 I feel a lot better about being on the attack. Though I had a heck of a time with the city. Next time I wonder if I should concentrate on the center with more of the force.
 I was going to replay this in Blitzkrieg Commander to test the differences. A couple things has changed my mind about this: 1. I'm done with this scenario - I took too long to play it. 2. and most important - I'm sent in my registration to do my first ever GMing of a game at a small con held here in St Louis called Command Con in November. I will be running a BKC II game! Nervous and excited. More in an upcoming post.


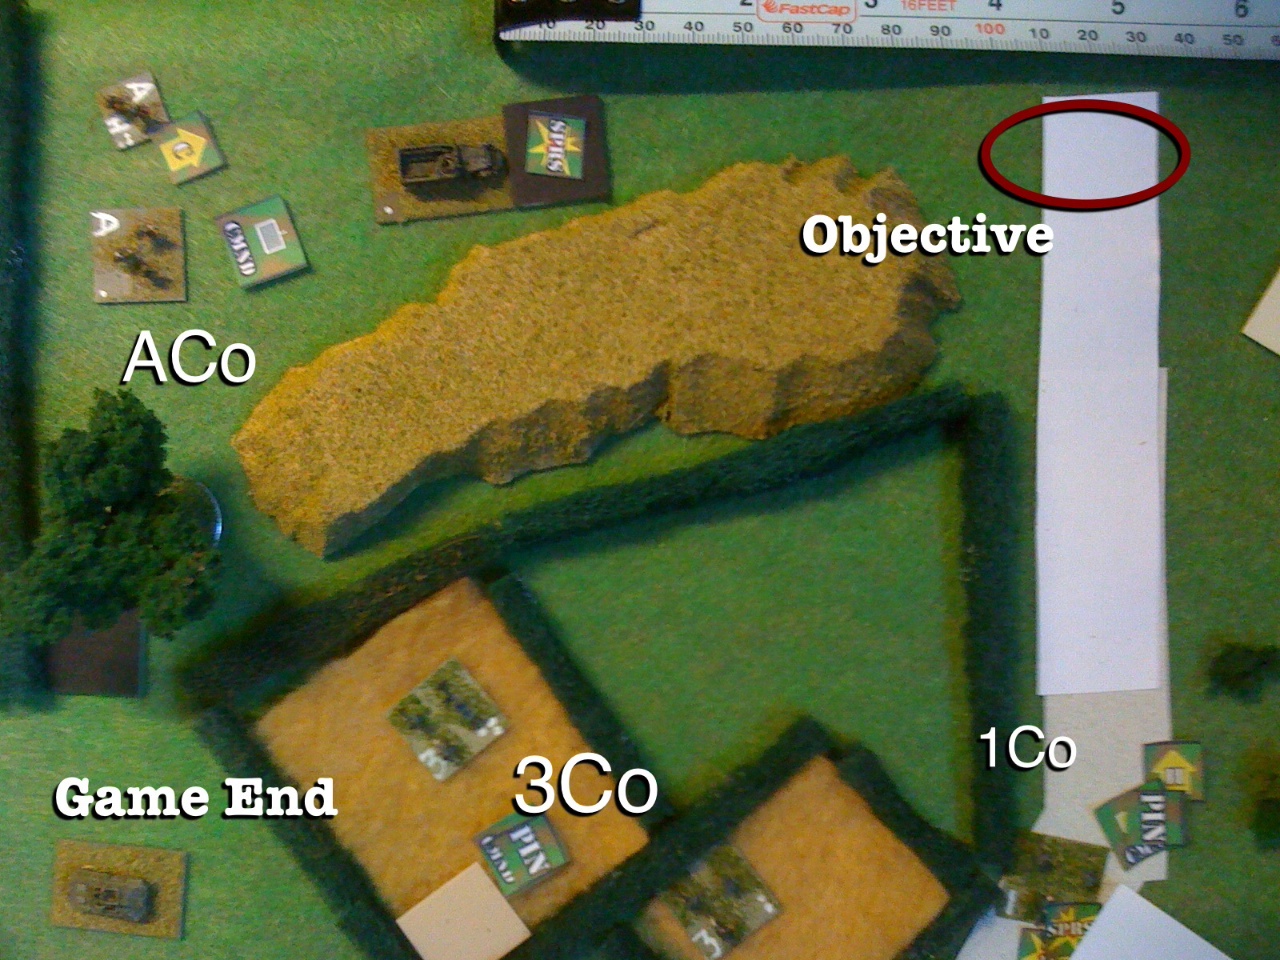
 Quite eventful. The US arty pinned the German Co covering the US left flank. Effectively knocking down their shooting ability, because on top of pinned, they were suppressed. This is a big role is supposed to play. ACo was able to lay enough fire on them to kill one unit. Which, when the morale phase rolled along, they suffered some big penalties and were required to fall back and became demoralized. Which effectively shuts them down a few turns. ACo will be pressing hard this next turn.
 Which brings us to the Germans covering the center. They were given the command to hold. However, I'm wondering now if they should fall back to positions closer to the road objective. They could still move under the cover of the hill and bocage and be able to get all the way back to the road. Thus being within 6cm of it. Perhaps the next turn.
 This turn shows a big part of this game coming through: command and morale. For example, the center dilemma for the Germans - do you purposefully spread your company out? One the US left - pinning a couple of the platoons, pins the entire platoon. Then by killing one, the entire platoon suffers the penalties and are all forced back and demoralized. Pretty heavy price to pay. This was the toughest aspect of this game to get used to. Then, of course on the US right, BCo being eliminated because of an extremely high morale roll. Heavy stuff. -6 modifiers alone because 3 units were eliminated. Then, being within 12cm of an AFV and of personnel.
  US ACo commander is forced back by Arty fire, other stands simply suppressed. ACo then assaults German Weapons team in entrenchment, German opp fire forces that stand back. In following fire by the US weapons stand, the German weapons team is forced back and out of the entrenchment. The US weapons team gladly moves in.


